How to enable telnet in windows 10
Table of Contents
The telnet client isn’t installed by default. You’ll have to install it from the Control Panel or Command line. Once installed, you can use the telnet command to connect to telnet servers without installing any third-party software. Here I am going to sharing how to enable / install telnet in windows 10.
Once telnet enabled / installed in your system, then we can validate whether application is running or down in the destination server without executing the application url in the browser.
How to open command prompt with administrator
Go to search by click on start windows icon, type cmd, then will see command prompt application, right click on that application and click on Run as Administrator.
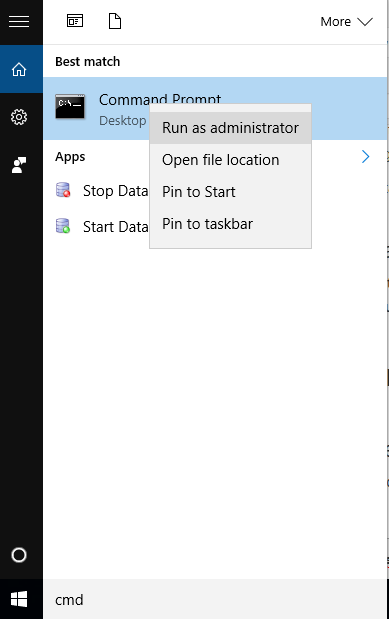
Open Command Prompt with administrator
To check telnet is whether enabled / installed or not
If the telnet not enable in the system, will get the same following error. It means that telnet not enable in the system.
C:\>telnet google.com 80
'telnet' is not recognized as an internal or external command, operable program or batch file.
C:\>
Enable From Command Prompt
To run the below command, we have to open command prompt with administrator as mentioned above.
C:\Windows\system32>dism /online /Enable-Feature /FeatureName:TelnetClient

Deployment Image Servicing and Management tool
Version: 10.0.10586.0

Image Version: 10.0.10586.0

Enabling feature(s)
[==========================100.0%==========================]
The operation completed successfully.
Enable From Control Panel
- Right click the start button and select “Programs and Features”.
- Select “Turn Windows features on or off” from the menu on the left.
- The Windows Features window should open, scroll down and select “Telnet Client”.
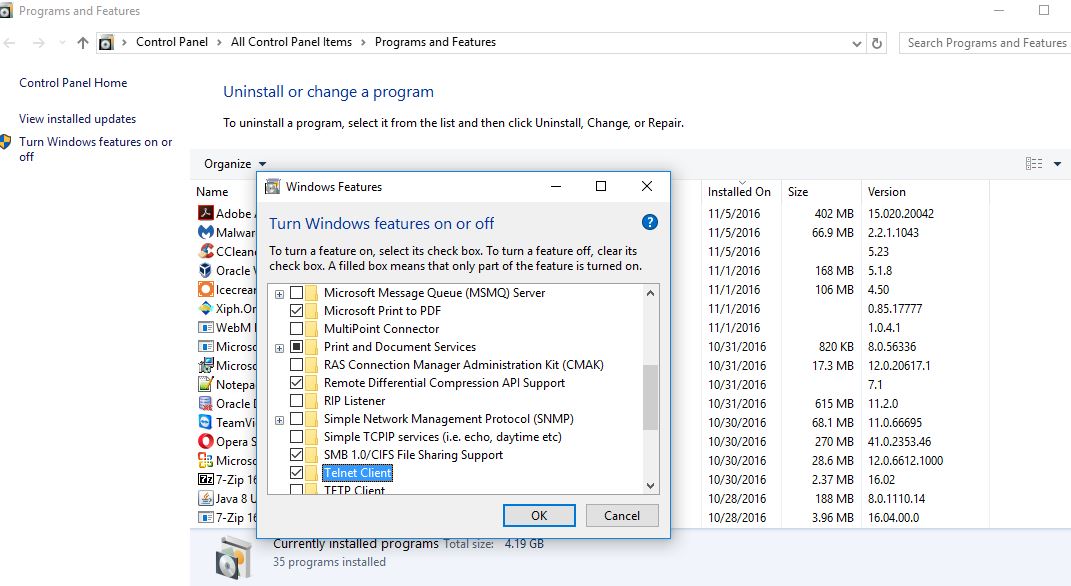
How to enable telnet in windows 10
4. Click on OK button to proceed, this will display a screen while the changes apply.
5. When complete it will display message as “Windows completed required changes“.
Verifying telnet client is whether enabled / installed or not
Simply open command prompt or powershell, type ‘telnet’ and press enter. If this was successful you should have a prompt similar to the below:
Welcome to Microsoft Telnet Client

Escape Character is 'CTRL+]'

Microsoft Telnet>
To check other server application connectivity
Destination server host name or ip and port are required to check whether we have access it or not.
Syntax
C:\Windows\system32>telnet << destination- host name or ip >> << port >>
Example
C:\Windows\system32>telnet smtp.gmail.com 587
Output
220 smtp.gmail.com ESMTP a66sm30167340pfe.51 - gsmtp

Hello! I am Narayanaswamy founder and admin of narayanatutorial.com. I have been working in the IT industry for more than 12 years. NarayanaTutorial is my web technologies blog. My specialties are Java / J2EE, Spring, Hibernate, Struts, Webservices, PHP, Oracle, MySQL, SQLServer, Web Hosting, Website Development, and IAM(ForgeRock) Specialist
I am a self-learner and passionate about training and writing. I am always trying my best to share my knowledge through my blog.


 Training Course Content")

